Master Model Railroader

"An NMRA member qualifies as a Master Model Railroader when he or she has obtained at least seven of the eleven Achievement Certificates provided that he or she has earned at least one Achievement Certificate in each of the four areas of the Regulations. Earning the title of Master Model Railroader is the ultimate goal for many participants in the Achievement Program."

Wednesday, November 20, 2013

Master Builder Cars - A major effort

After my initial success with the Helium Tankcar back in 2011, I wanted to get this certificate done as fast as possible. I decided to mostly scratchbuild the remaining cars, to be on the safe side, so I had to plan ahead with the BR convention in October 2013 being my goal.


1892 AT&SF Hanrahan Refrigerator Car in HO

My first car in the row is a vintage refrigerator car of the Hanrahan Design built for the Atchison, Topeka and Santa Fe Railway back in 1892. I was fascinated with this double door reefer. Fortunately a wooden kit is manufactured by Labelle, so I ordered one and an extra set of decals, just in case I would mess up one (what I actually did :-S)

I used the instructions and constructed the car from Evergreen styrene strip and sheet instead of wood. The only commercial parts I used were the door latches, brakewheel, trucks, turnbuckles and brake fittings). The prototype did not have the knuckle couplers but link and pin couplers instead, so I installed the only ones I could find, the Gilpin Tram couplers from Grandt Line. In the meantime I also did my own using plastic knuckle couplers that I convert to link and pin couplers (but that's another story)


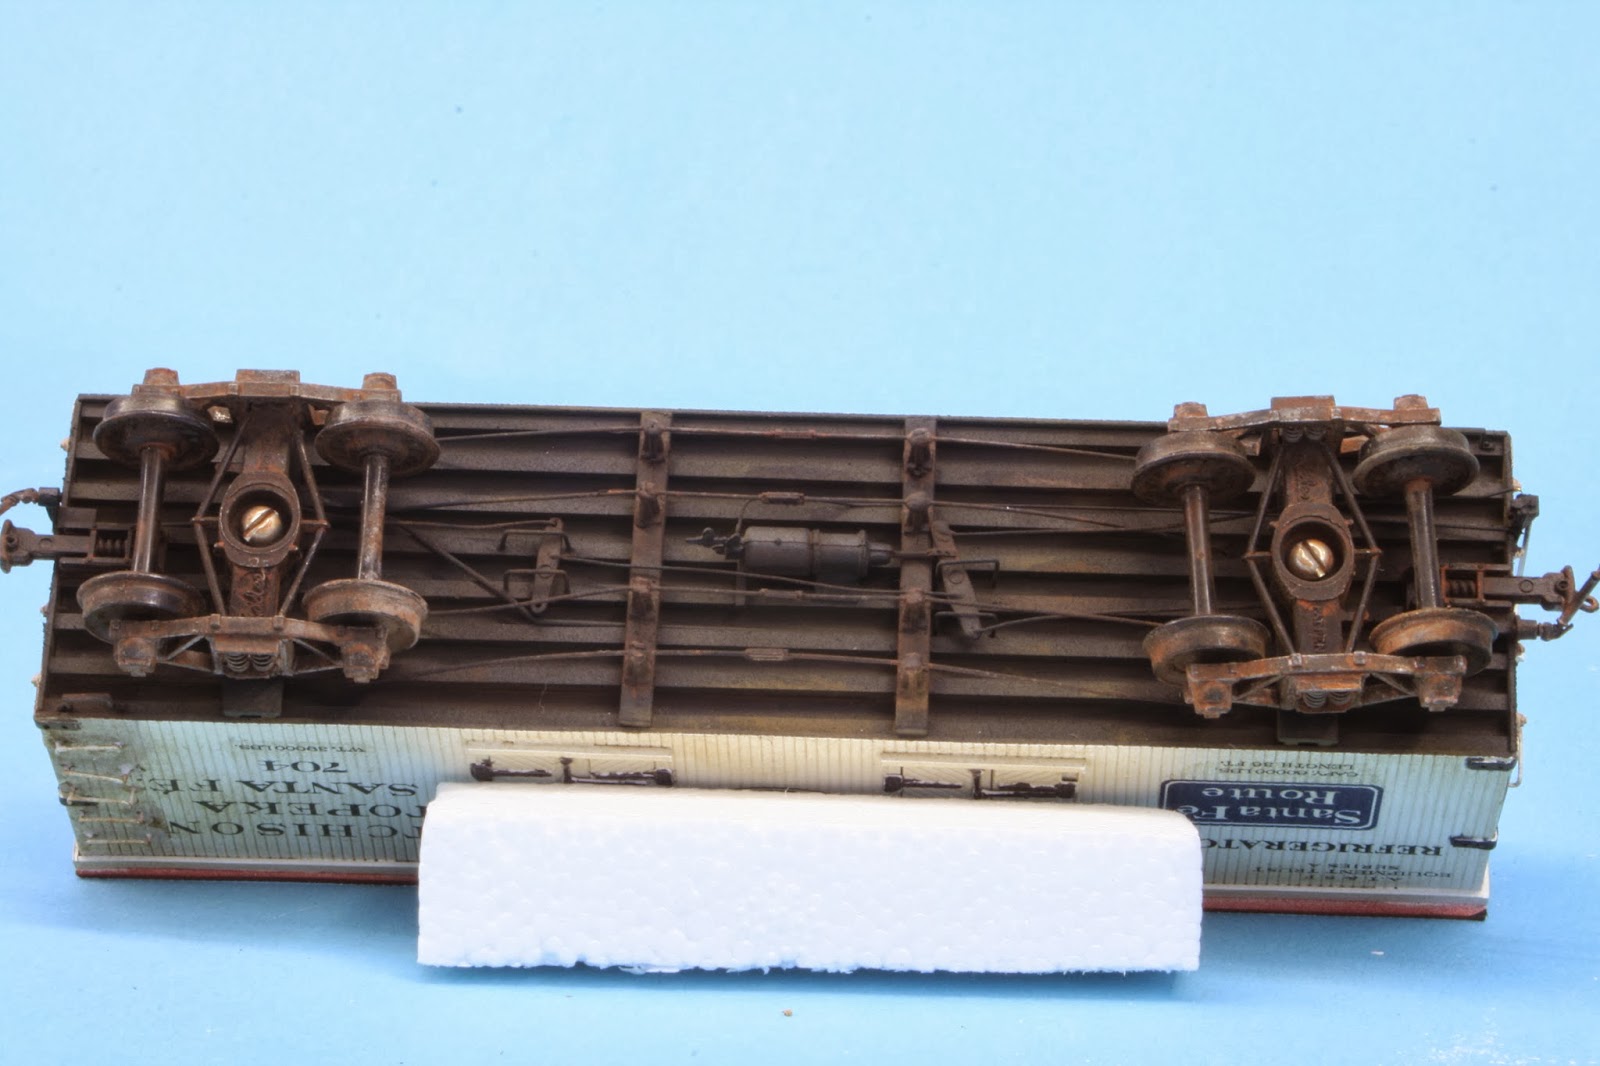


the score: 99/125

Construction: 27/40
Detail: 15/20
Conformity: 23/25
Finish: 21/25
Scratchbuilding: 13/15


Southern Pacific Narrow Gauge Boxcar #5 in On3

I am also a Narrow Gauge Fan, so my other half of the models were build in On3 gauge.
I had a couple copies of plans for Southern Pacific Narrow Gauge cars that I wanted to build. With most narrow gauge equipment the basic car was the Flatcar, on which everything else was build up.


The score: 101/125

Construction: 30/40
Detail: 17/20
Conformity: 22/25
Finsih: 18/25
Scratchbuilding: 14/15


Southern Pacific Narrow Gauge Low Side Gondola in On3

As I said above, the basis for most cars was the Flatcar, so it was obvious to include one. After I finsihed tha car I found that this was too simple and that I could easily build a gondola by simply adding the sides to the stake pokets. The sides are basically two boards attached to stakes. I installed a total of 176 nut-bolt-washer castings. The sides are inserted into the stake pockets. So I have two cars in one.


The score: 102/125

Construction: 28/40
Detail: 17/20
Coonformity: 24/25
Finish: 19/25
Scratchbuilding: 14/15


Monson Snow Spreader in On2 1/2 (On30)

In a Narrow Gauge Gazette I found an article about this spreader in HOn3. I liked the idea of scratchbuilding the superstructure and especially the spreader blades.
There were only a couple of black and white photos to imagine how the real car looked and what particular details it had. The HOn3 model was a bit to small to recreate all visible details in the photos, but in On3 it could be done. The spreader superstructure was mounted to the flatcar with brakets and U-bolts, so I believe that it could be removed as well. This was a very nice detail to model, as well as the blades that can be swung out and locked in place with small bolts.


The spreader blades are 3 pieces of brass sheet, soldered together following the drawings in the article. I also drilled holes to install some nut-bolt-washer castings.


The flatcar is a superdetailed Bachmann underframe. These are intended to replace the stock underframes from the On30 cars. I installed tension rods, new brake gear, stake pockets and wood planking.


Throughout this was a very rewarding experience and its one of my favorite cars


The score: 96/125

Construction: 27/40
Detail: 18/20
Conformity: 24/25
Finish: 17/25
Scratchbuilding: 10/15


Winch Car in On3

The last car in the row, although my first On3 car that I've built also comes from an article in the Gazette. Lee Vande Visse built it back in the 1980's for a contest. Again its unique design, a common practice with many narrow gauge railroads, inspired me to build it. Based on a D&RGW flatcar it has a "homemade" shack to protect a gasoline winch that was used to tear up used rails for replacement. The A-frame rack and cable guide are the most visible details as well as the reinforcement rails along the deck. Sometimes these rails were also installed to the underframe, but here they are more visible. They are also attached with U-bolts and brackets.


The score: 100/125

Construction: 29/40
Detail: 18/20
Conformity: 23/25
Finish: 17/25
Scratchbuilding: 13/15


I was totally surprised that all of my five cars received a Merit Award, although I only needed three to meet the requirements.

Lessons learned:


Construction:


Take care to keep everythin level and square.
Don't use excessive glue.
Avoid glue spots.
Sand all wooden parts prior to assembling and painting
Watch for fuzz and sand it away.

Detail:


You cannot have too much detail
Check your plans and photographs thoroughly and try to add all details that should be there, either through scratchbuilding or commercial castings.

Conformity:

Try to conform to the prototype you model, either real or freelanced
Supply as many drawings, photos (black/white or color), articles etc, as you can. This is a dead on category where you cannot have enough reference material.
You probably noticed that I scored an average of 23.5 out of 25 in this category.

Finish:

Decide whether you recreate a used or an almost new car. The finish should be appropriate to its "age" or the prototype pictures that you supply.
Watch for a neat paint job, without running colors.
Apply your decals straight.
Seal the decals with dull- or glosscote to hide the decal film
If weathering your car, don't overdo it, but remember: even a new car already shows some weathering, if only on the trucks.

Scratchbuilding:

Scratchbuild as many items as possible.
Some basic parts are excluded, like trucks, couplers, light bulbs and wood/plastic strips and sheets
If you scratchbuild hardly visible parts, do mention them in your description so that you get credit for.


Scratchbuilding as many parts as possible is definitely the way to go, although this category only counts for 15 points, but it might be just these points you'll need for the Merit Award.

I might have forgotten to mention a couple of things but before starting I advise you to read, and reread the instructions for every category and if in doubt, call your AP manager.


Monday, November 18, 2013

Master Builder Cars - First success

With the Master Model Railroader Certificate almost within reach, it was time to turn to building rolling stock models to complete my required certificates.

Different types of cars have to be modeled with a total of eight. Four models must reach the minimum of 87.5 points. After having completed six certificates already I was now confident that I could also succeed with cars. I also had the different cars in mind that I wanted to build like a Flatcar, a Boxcar, a Reefer and perhaps a Tankcar.

The car I had in mind was not an ordinary Tankcar like the one everybody knows but a Helium Tankcar. At a swap meet I purchased an old Ambroid kit of exactly this car. This was a wooden craftsman kit with a handfull of stripwood and metal castings. I took the plan and purchased Evergreen styrene strips instead. If you ever tried to make wood look like metal you understand my reason for doing so..

I then built the car following the instructions using styrene basic shapes and a couple of commercial castings (ladders, brakewheel, couplers etc)


From the old decal sheet supplied in the kit I drew new decals on my computer and printed them out on plain decal paper.

I finished the car right on time for the 2011 NMRA convention in Sacramento, Ca. I was very excited about the score it would get. I invested so much time to build this car, so if it would not get the minimum score I didn't know what to do to succeed in this certificate.

After the judging was finished the car earned 90 points out of 125, a Merit Award and a Honorable Mention. I had convinced the National Judges of my skills and now I knew that I was on the right way.

Here's the detailed score:

Construction: 28/40
Detail: 12/20
Conformity: 25/25
Finish: 15/25
Scratchbuilding: 10/15


Cars is probably one of the most challenging certificates because the models you have to build are not static like structures are. When installing the brake riggings, you must take care that the trucks swivel enough to negotiate turnouts and curves, It is nevertheless one of the most rewarding experiences that I've made. To see a piece of rolling stock emerge from a handfull of strips and bits and pieces.

I decided to scratchbuild all of the remaining cars, because the chances are bigger to reach the needed score. 


Sunday, November 17, 2013

Master Builder Cars - First efforts

The first certificate that I started to build models for was Master Builder Cars back in 1999. That was the time I was persuaded that this would be the easiest certificate of all (!!). Ha!

I modified an Athearn Santa Fe cupola caboose or waycar to stay with Santa Fe lingo. I installed brake gear, new ladders, window screens, marker lights etc and was very proud of the outcome, because I followed a construction article from Andy Sperandeo from Model Railroader Magazine


I submitted my model at the NMRA concention in Minneapolis/St. Paul in 1999.
Although the judges certified me a throughout good job, it nevertheless earned only 64 points out of 125.


Construction: 18/40
Detail: 9/20
Conformity: 21/25
Finish: 14/25
Scratchbuilding: 2/15
This judgement made me aware of the fact that I probably had not the required knowledge yet to succeed in this certificate.

I then put cars on the backseat and continued with structures instead.


In the meantime I tried my hand on scratchbuilding a simple flatcar and entered for merit award judging in 2003 or 2004 at the British Region convention.


I probably did not do enough research and although it was almost completely scratchbuild except for the trucks and couplers it only earned 68 points.

Construction: 20/40
Detail: 12/20
Conformity: 13/25
Finish: 10/25
Scratchbuilding: 13/15

That's when I laid cars completely aside for a couple of years and it would only be my last certifcate that I completed before MMR.

More on this in another post.


Tuesday, October 29, 2013

My 7th certificate!

Last weekend I attended the British Region convention in Meriden near Birmingham.

After the saturday night dinner I received the Author Certificate from the hands of British Region AP chair Steve Park. This is my 7th certificate toward MMR, but the right one has still to be earned, which is Master Builder - Cars to fulfill the requirements of having at least one certificate from the 4 categories.

I also entered 6 models to be judged and the outcome of the contest judging exceeded my expectations so that from the 6 models I entered, 5 won a Merit Award with reasonably high scores. I'll post this in a separate post.


Monday, October 28, 2013

Golden Spike Award


The best and easiest way to start in the Achievement Programm in my eyes, is to begin with the Golden Spike Award. Many modellers own a home or show layout without knowing that they already have done a big part in achieving this award.

Here is what’s to to. If not sure, ask your local AP chair.

Golden Spike Award

The Golden Spike is the easiest, and for many people, the first AP award that they earn. It is designed to demonstrate familiarity with different areas of the hobby, rather than expertise in a particular area. So take a look at the requirements - you may find that you have met most, or all of them already.
Here's the Golden Spike Award Application Form . Use it as a checklist, you may surprise yourself.
  1. Rolling Stock (Motive Power & Cars)
    • Display six (6) units of rolling stock (Scratchbuilt, craftsman, or detailed commercial kits).
Notice that the requirement is to "display" them. Nowhere does it say that they must earn a minimum number of points in judging - just that they must be displayed. ( In the monthly contests at your division meetings, for example. Even having them set out on your layout, or a table in your basement counts as "display").
These models need to show a little more effort than a "shake the box" kit. For example, by itself a freight car kit straight out of the box, is not enough to qualify. However, by painting and decaling it, adding a little detailing, perhaps some weathering, etc., you'll have a qualifying model in no time!
  1. Model Railroad Setting (Structures & Scenery)
    • Construct a minimum of eight (8) square feet of layout.
Again, there is no requirement about how good or how elaborate your layout must be - just that you must "construct" it. On the other hand, you may have trouble convincing someone that a loop of track nailed to a piece of green painted wood constitutes a "layout" . . . How much is 8 square feet of layout? Well, a typical module is 4 feet by 2 feet, and would easily satisfy this requirement.
    • Construct five (5) structures (scratchbuilt, craftsman, or detailed and commercial kits). These structures may be separate, or one or more of them may be part of a single scene.
The same comments apply here about the type of kits. The idea is to show that you can do more than glue a simple plastic kit together. Painting or weathering are good things to consider. Remember that "structures" aren't just buildings. Things like bridges and trestles also fall into this category.
  1. Engineering (Civil & Electrical)
    • Three (3) types of trackage are required (turnout, crossing, etc.). All must be properly ballasted and installed on proper roadbed. Commercial trackage may be used.
This requirement sounds a lot harder than it is. First, notice that last sentence about commercial trackage; you don't have to hand-lay anything - you can just install a store bought turnout. "Types of trackage" can be just about anything: turnouts, crossings, and grade elevation (a change in elevation of the track) are all examples of "types of trackage". Also, note that the three types DO NOT have to be different. For example, just having three simple turnouts will qualify. The "proper roadbed" requirement can be met by laying the track on a raised roadbed, ( such as cork ) and ballasting it. The purpose of this requirement is to show that you understand roadbed profile, drainage, etc.
    • All installed trackage must be properly wired so that two trains can be operated simultaneously (Double-track main, single-track main with sidings, block or command control, etc.).
This requirement can also be easier than it sounds. Notice the option for a single track main with sidings. This means that as long as you can cut power to the sidings individually, you can run one train, park it on a siding while you run another, then park it and run the first again. This meets the requirement.
    • Provide one additional electrical feature such as powered turnouts, signaling, turnout indication, lighted buildings, etc.
Don't read more into this than is there. A powered turnout can be something as simple as an Atlas turnout with a switch machine. Think in terms of anything that runs off the 'Accessories' terminals of a power pack and you 're half way there.
One other thing to remember: Not all of these requirements need to be met on the same layout (or piece of layout). They don't even need to be met in the same scale! If you want to build G scale rolling stock, an N scale Model Railroad setting, and an HO scale layout for trackage and wiring, go ahead.
Also, the Golden Spike, as well as the other parts of the AP have a certain amount of flexibility. For example, suppose you and your (friend / spouse / child) work together on all your projects, but do twice the required amount (12+ units of rolling stock, 16+ square feet of layout, 10+ structures, etc.). You can both be considered, as long as you can show that you have each demonstrated the required skills.

Master Builder - Cars (Requirements)


Master Builder - Cars

A "Car" is just about anything that runs on rails and is NOT self-propelled (if it's self-propelled, it's Motive Power). This includes freight cars, passenger cars, maintenance of way cars (including equipment such as cranes), cabooses, cable cars, unpowered (dummy) locomotives, etc. Actually, if you have a model which is self propelled, but is a model of something that was designed to carry something (besides itself), such as a rail car, it can be used as one of the qualifying models for either Motive Power or Cars, BUT NOT BOTH.
Contact your Regional AP Manager if you have a question about which category a particular model would fall into.

To qualify for the Master Builder - Cars certificate:

  1. You must build eight operable scale models of railroad cars:
"Operable" means that they must be able to roll on the track, negotiate a curve, be pulled by something, etc. It doesn 't mean that every door, valve, or other moving feature of the car must work as the prototype does. (However, any operating features that you can include in your car are likely to increase your score.)
1.      There must be at least four different types of cars represented in the total of eight. One of these must be a passenger car.
"Passenger cars" include anything that would normally be found in a regular scheduled passenger train including baggage cars, express reefers, business cars, or other passenger carrying cars like drover's cabooses.
2.      Each of the eight models must be super detailed with either commercial parts or scratch built parts (for extra points).
3.      In addition to being super detailed, at least four of the eight models must be scratch built. The term "scratch built" implies that the modeler has done all of the necessary layout and fabrication that produce the final dimensions, appearance, and operating qualities of the model.
The following parts are specifically excluded from the scratch built requirement:
      • Wheels
      • Couplers
      • Light bulbs & electronics.
      • Trucks.
      • Brake fittings.
      • Marker lights & drumheads.
      • Paint, decals, etc.
      • Basic shapes of wood, plastic, metal, etc.
("Basic shapes" are things that the builders of the prototype would have used as raw materials. For example, an "I" beam would be a basic shape; a commercial door or window casting would not.)
2.      You must earn a score of at least 87-1/2 points on four of the eight models in either an NMRA sponsored contest or in AP Merit Award judging.
Note that only four of the eight must earn 87-1/2 points. The others don't even have to be judged! They do all have to be described on the Statement of Qualification (see below).
3.      You must submit a Statement of Qualification.

Achievement Programm Categories

Achievement Categories

In order to acknowledge exceptional achievement in the many phases of scale model railroading, the following achievement categories have been established to encompass both the technical and service phases of the model railroad hobby. 

Earn a minimum of seven AP certificates (out of the eleven available) then submit a Statement of Qualification.

Of these seven certificates, you must have at least one from each of the following four areas:

Model Railroad Equipment:
Settings:
Engineering and Operation:
Service to the Hobby: