Master Model Railroader

"An NMRA member qualifies as a Master Model Railroader when he or she has obtained at least seven of the eleven Achievement Certificates provided that he or she has earned at least one Achievement Certificate in each of the four areas of the Regulations. Earning the title of Master Model Railroader is the ultimate goal for many participants in the Achievement Program."

Wednesday, November 2, 2016

Master Builder - Motive Power (Written documentation sample)

The following pages are a sample of my written descriptions. I also add copies of the articles and additional photographs if available. This time I included photos of the different building steps, to show the judges how I put the model together or how I constructed special items. Sometimes pictures tell more than a thousand words.

I know that many members hate all this paperwork, but being a judge myself, I know how frustrating it is when you are looking over a model and you can only score what you see. Most of the time there was more work done than is actually visible.

As a positive side effect, a detailed description may also serve as the base for an article, if you're working on your Author Certificate as well.


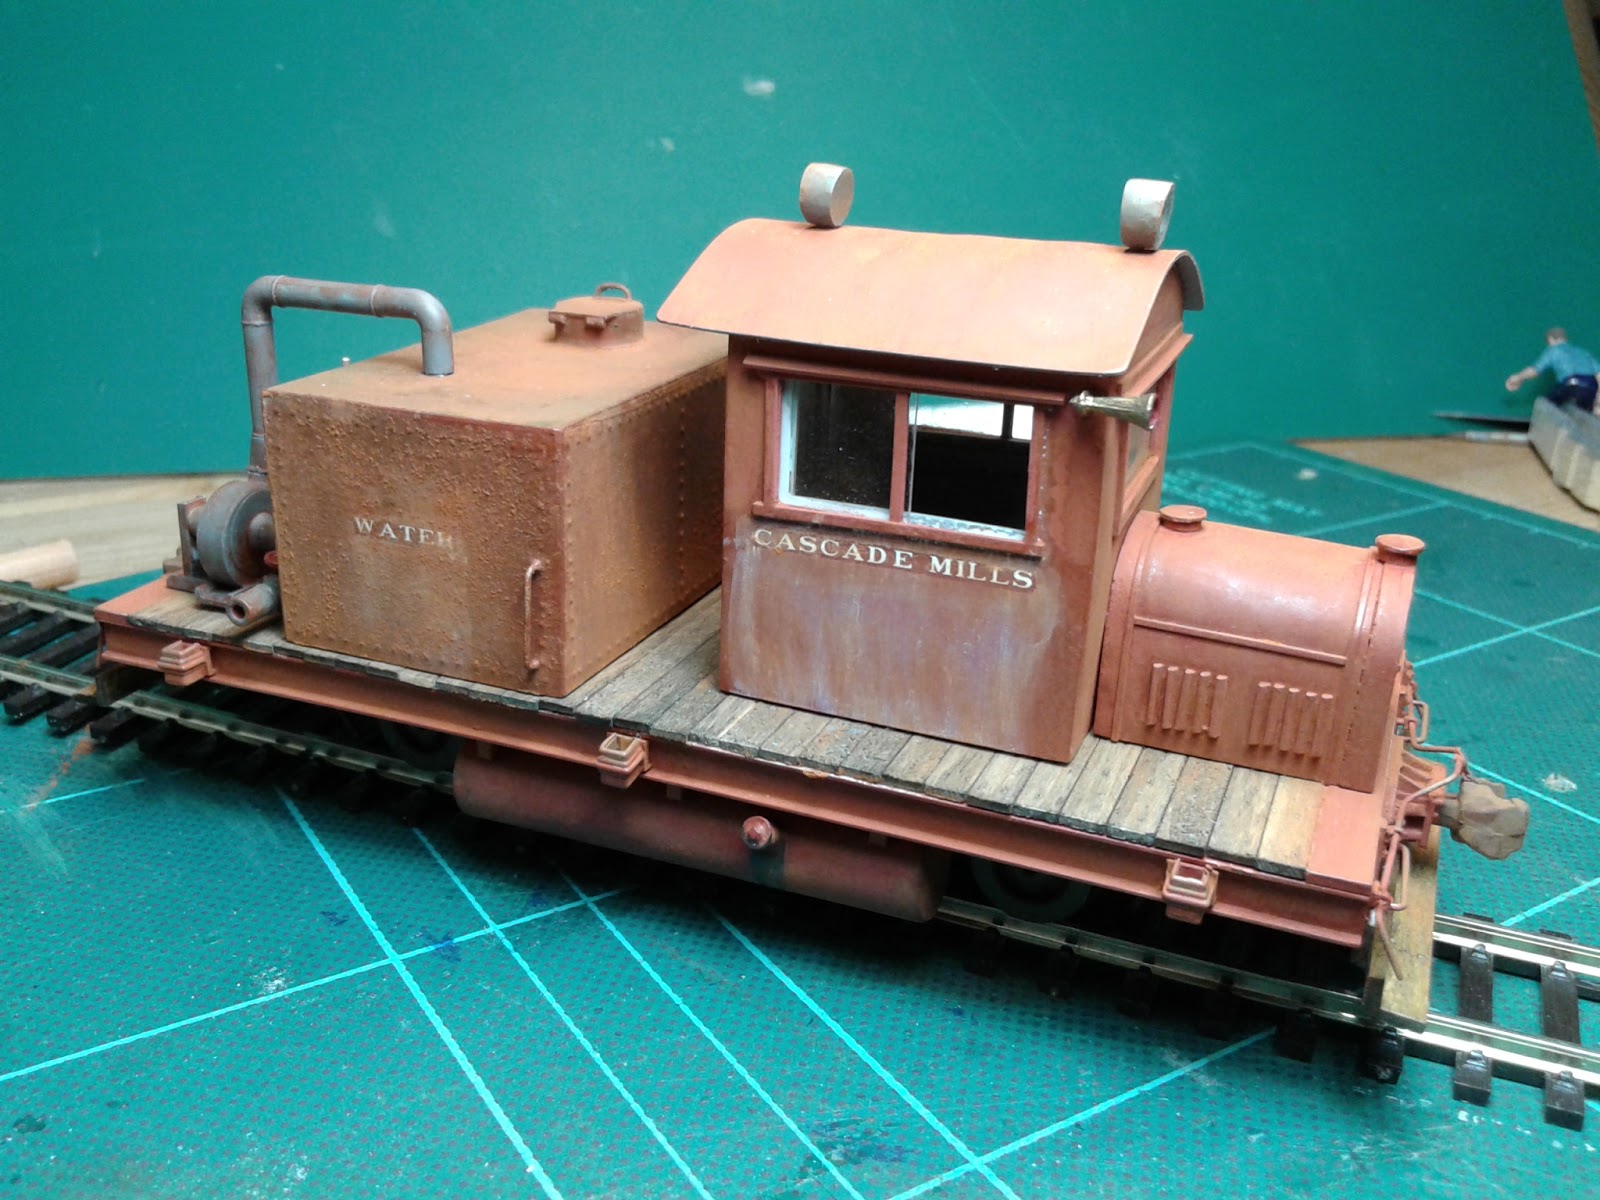
Master Builder - Motive Power (On30 Rail Truck)

After having eight certificates checked off and Master Model Railroader status achieved, I realized that the remaining three would be not so far out of reach. I found that my skills were refined enough to dare the Motive Power Certificate.


Like with some of my models for the Cars Certificate, I browsed through the pages of my magazines to find something that inspired me to build. A little critter caught my eye in an issue of the Narrow Gauge Gazette. It is actually a M.A.C. Model 4-41 Rail Car which was build by Motor Appliance Corporation, the name under which Skagit Steel & iron Works in Sedro Wolley, Washington marketed these gasoline powered rail cars. Not to be confused with the Mack trucks, rail buses and locomotives built in Allentown, Pennsylvania.


The deck of the rail car was basically a powered flatcar with a cab and an engine hood on top. Because I did not have any spare parts or gears to build the power chassis from scratch, I decided to look for a powered chassis which could be substituted. The motor, gears and wheels are parts that are exempt from scratchbuilding, so I found that the HO powered rail bus from Bachman would fit the bill.


I left an opening in the deck to allow it to sit deeper on the chassis. The underframe with the sills, coupler and stake pockets finished, I turned to the cab and hood.


I formed the radiator from three layers of plain styrene with a rectagular cut-out for the brass mesh, representing the radiator grill. I curved a piece of .015" styrene in boiling water to avoid breaking it.


Then I applied louvers from quarter round styrene strip and trim using 1x2 strips. The radiator and sander caps are scrap pieces of styrene tube and .015" sheet.


The cab was build from four pieces of plain styren with cut-outs for the doors and windows. The water tank is also basically a rectangular box from plain styrene sheet.


I made the roof removable to see the interior.


The water pump is basicalle the front part of an HO tractor model with blower castings and piping from Auhagen.


I added some more details to the underbody. A Grandt Line brake cylinder with rod, brake pads on all four wheels, sander piping to all four wheels, an exhaust side pipe, gasoline tank and tool box


The water tank received several layers of Rustall and burnt umber to recreate heave rust.


The cab, deck and roof underwent also a heavy weathering treatment. I stained the planks with my usual black ink and isopropyl alcohol mix and also punched nail holes, taking care to locate them exactly over the sills underneath. I decalled the cab sides with a fictional name and the water tank with the wording "Water". The decalling on the sides actually came from a Santa Fe passenger car name as well ass the "Water" decal from the tank.
 

Then I attached all these components on top of the deck.


Because the cab decal left some silvering after application I tried to improve the look by simulating the white from the lettering running down the sides of the cab. This was achieved by applying small dots of white oil paint to the letters and with a wide brush dampened with Turpentine I streaked the paint down.

The effect of the running white paint could not hide the silvering completely, but it did not lead to a major loss of points.
  

The final touch before heading to the convention in Birmingham was to add the engineer figure into the cab.


Tuesday, October 28, 2014

Awards Ceremony

My Master Model Railroader status was already announced in January this year, but for the receipt of my certificate and engraved plaque I opted for the British Region Convention in October 2014.

So I attended the convention from October 17-19, 2014 in Bournemouth.

After the Saturday Banquet the traditional Awards Ceremony started with the Contest results and the Merit Awards for the models that reached at least 87.5 points out of 125.


The MMR Award consists of various documents (Plaque, Certificate, Congratulatory Letter, Jacket Patch and Lapel Pin)
Steve Park, the Department Assistant Manager of the Achievement Program suggested to split the honor of awarding these documents to me among the Past President, the actual President and finally himself.


Keith Webb, the Past President of the British Region handed me the congratulatory letter from Paul Richardson (Department General Manager) together with the Jacket patch and lapel pin.


Mike Arnold, the new President of the British Region  made a very nice introduction (we laughed a lot during the ceremony) and handed me the Certificate.


On the picture above, Yours truly flanked by Mike Arnold and Steve Park


Finally Steve Park awarded me with the engraved plaque, stating me as MMR #526.

The plaque will be prominently placed in my home. I am very proud of what I have achieved and again I want to thank everybody who helped and encouraged me along this wonderful journey.

Friday, May 9, 2014

MMR announced

Now its official.


My last certificate, Master Builder Cars and my MMR achievement have been published in the NMRA Magazine in May 2014.


 Together with my Model Railroading Biography


Friday, January 31, 2014

Master Model Railroader #526


Received a note today from Frank Koch, NMRA Executive Assistant Manager of the Achievement Programm that I've been awarded Master Model Railroader #526.

This is a very happy moment for me, as a long journey through all aspects of model railroading has led to this achievement.

I want to thank all the great modelers and friends that I've met along the route, without their help I would not have succeeded so fast.

Now is the beginning of a new chapter - helping others to achieve this ultimate goal.

Saturday, January 25, 2014

I finally did it!!!

With the final car finished, I submitted my paperwork to my Region AP Chair just in time before the end of 2013.

Today I received my 8th Certificate in the mail.

Beyond my expectations I had earned 6 Merit Awards with my rolling stock models although I only needed 4 to meet the requirements of the Achievement Program.

With the submission of the paperwork for the last Certificate, a ten year lasting journey takes an end. I finally succeeded in what I never thought would be possible for a foreign member of the NMRA.

During all these years I learned to improvise and to jump over my own shaddow to make it possible to participate in the program. To get more chances for my models to be judged, I joined the British Region and over all these years I met many great modelers and also made a bunch of new friends. Through the participation in the AP I definitely refined my skills and through the positive critiques and help of these fine people, I became a better modeler.

Therefore a big THANK YOU! to all the members I've met along my route to become a Master Modelrailroader.


Tuesday, December 17, 2013

Passenger Car

To meet the requirements for the Master Builder - Cars Certificate I also had to build a passenger car.

I wanted to try a kitbash following the instructions from Steve Sandifer and build a Santa Fe Baggage Railway Express car with the distinct fishbelly sills


The base for my kitbash is an undecorated baggage car from Athearn. Fortunately I had purchased a couple of these before the Blue Box kits forever disappeared in history..


First I sanded the roof smooth and removed all cast on grab irons and curved drip rails. The Santa Fe drip rails over the doors were peaked.


I replaced the grab irons using brass wire bend to shape as well as Detail Associates commercial grabs.


I fabricated the fishbelly sills from .030" plain styrene sheet


I attached the side sills to the underframe of the car, although they should be glued directly to the body. But this would make the removal of the underframe impossible. And as you see in the pictures, this is hardly visible.


I covered the lower part of the baggage doors with .010 plain styrene sheet (mine was clear because I ran out of white). The Santa Fe doors were plain instead of ribbed.


Unfortunately I did not find suitable stirrup steps, so I used 3 rungs of brass ladder stock. I drilled appropriate holes into the body, glued the steps on and bend them to shape.


I mixed Pullman and Coach Green to closely match the Santa Fe color and airbrushed the entire car. After the paint had dried I masked the sides and airbrushed the underside and roof with flat black paint.


I added train and air lines and safety chains from a Branchline Trains Passenger car kit as well as a couple of underbody details, like air reservoirs, steam traps and battery box.


Fortunately I had a set of decals from a vintage Walthers Passenger car kit from the 1960's, to reproduce the correct lettering for this car. The Microscale Decal are missing the word "Baggage". The old decal film was quite intact but nevertheless I could not apply it without the film showing, even after it had dried overnight and with the application of another coat of Micro Set.


This kitbash was a good practice in recreating a typical Santa Fe car. There are a couple of things I will do differently next time, but that's the fun part of it.

Now it's time to fill in my SOQ and send my completed paperwork to my AP manager.