The second locomotive that caught my interest was built from an article I saw in the Narrow Gauge Gazette. The author built it in Gn15, based on an On30 chassis of a 2-6-0 steam locomotive.
I had an old MDC/Roundhouse kit of a 0-6-0 Tank Locomotive lying around and thought it could probably fit the bill if I build the same locomotive in On30 based on the HO chassis.
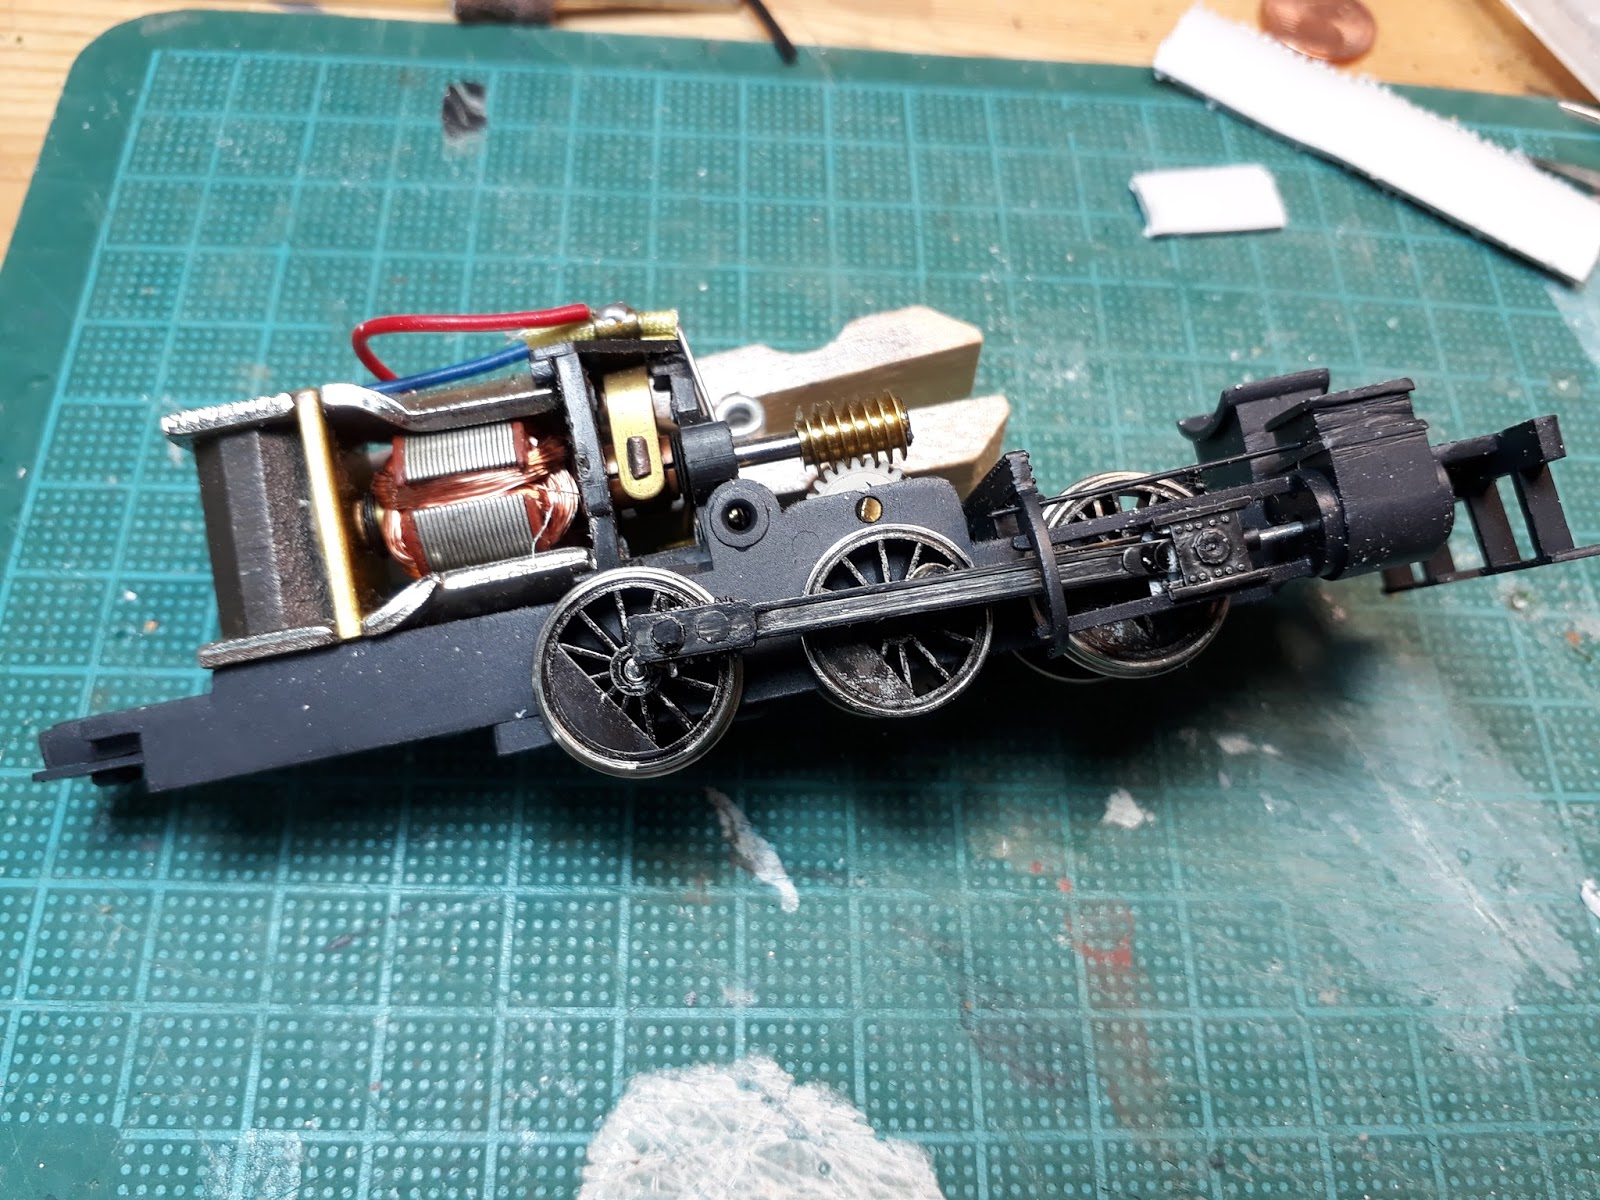
These old MDC/Roundhosue locomotive kits were state-of-the-art back in the early days although they all reminded me a bit to a coffee grinder when running. This locomotive has an open frame Pittman style motor screwed to the die-cast frame. A worm gear drives the center axle.
I imagined that I could use an PVC pipe, cut a slot out to fit over the motor and have by this a smokebox, boiler and firebox in one piece. The cab on the "prototype" model was sitting only 6 scale inches above the rails. I fabricated a platform for the cab which I could slide over the rear part of the frame and attach it with a screw. In case of motor problems I could unscrew the cab and remove the boiler tube which was held with a screw in front of the frame.
A very interesting item to build was the saddle tank that is located over the smoke box and boiler. I cut a hole, centered on the watertank for the steam dome. The two square boxes to the front are the sandboxes.
I build the firebox around the larger part or the PVC tube. The cab assembly slides over the rear tube and is attached to the frame with a screw on the bottom. I added levers and gauges from my parts box. The firebox door mechanism was built using a photo for reference.
I also included a fuel tank in the cab. Obviously the coal burner was converted to oil for its use in the mines.
The photo above shows the painted interior and part of the chipping paint effect on the outside of the cab.
I added quite a few features to the locomotive like sander pipes, pressure tanks, buffer beam and scratchbuilt draft gear boxes.
The front and rear buffer beams are balsa wood, scribed and weathered.
Unfortunately there was a big controversy about the use of commercial chassis or frames, with the result that this locomotive also did not earn a Merit Award. I insisted on a re-assessment and explained a couple of things I've done which obviously escaped to the assessors in their first evaluation. The model finally passed with 90 points and a Merit Award.
Although I put high hopes in my two builds, all the discussions around the scores nevertheless leave a bad taste. Although I'm very proud of how they turned out, I had to admit that some features were missing. But I never thought that a commercial frame had such an impact on the overall evaluation of the models.
I accepted the verdict and kept on building another model.
Master Model Railroader
"An NMRA member qualifies as a Master Model Railroader when he or she has obtained at least seven of the eleven Achievement Certificates provided that he or she has earned at least one Achievement Certificate in each of the four areas of the Regulations. Earning the title of Master Model Railroader is the ultimate goal for many participants in the Achievement Program."
Tuesday, January 16, 2018
Master Builder - Motive Power (Two more down) 1/35 Industrial Diesel Locomotive
In July 2017, in anticipation of the British Region Convention in Derby, at the end of October, I started building my second model for the Motive Power Certificate.
I wanted to build a small industrial diesel based on a commercial HO chassis. The locomotive in mind was a small freelanced narrow gauge diesel riding on roughly 600 mm track. If I build my model in 1/35 scale, I could use actual HO track.
I acquired a couple of small HO diesels from the Model Power range. Their Porter Hustler and DDT Plymouth are good candidates for such a conversion.
The Model Power chassis has the motor mounted vertically and it fills the cab of the locomotive, which is not very prototypical and impossible to correct if you want to add a cab interior..
As my locomotive will be in a larger scale, I could fit the motor under the new hood and leave the cab area free of obstructions. The body shell of the original locomotive was held in place with a screw from below. I used the part of the original shell and built the new hood around it. By this I was able to fix the hood with the screw.
For this build, I used the complete underframe and only added styrene channels along the sides, fabricated new buffer beams and reproduced weld lines along the edgers of the sidesills.
The hood featured a three-piece radiator grille, engine doors, sand filler hatch and chimney. The cab is an open version.
The small piece of the die-cast weight will be covered with the gearbox.
There is still enough room under the hood to house the front light and the decoder and wiring.
I painted the frame with a signal red color. For the body I tried the rock salt chipping paint method, which rendered a very nice rusted finish with chipping paint..
The levers, gears and seat are all scratchbuilt using different bits and pieces of styrene.
Well, as you can see, the effort was not worth a Merit Award, but worth a new experience because this was my first freelanced locomotive. I could try a couple of new techniques, both in scratchbuilding and painting/weathering.
I wanted to build a small industrial diesel based on a commercial HO chassis. The locomotive in mind was a small freelanced narrow gauge diesel riding on roughly 600 mm track. If I build my model in 1/35 scale, I could use actual HO track.
I acquired a couple of small HO diesels from the Model Power range. Their Porter Hustler and DDT Plymouth are good candidates for such a conversion.
The Model Power chassis has the motor mounted vertically and it fills the cab of the locomotive, which is not very prototypical and impossible to correct if you want to add a cab interior..
As my locomotive will be in a larger scale, I could fit the motor under the new hood and leave the cab area free of obstructions. The body shell of the original locomotive was held in place with a screw from below. I used the part of the original shell and built the new hood around it. By this I was able to fix the hood with the screw.
For this build, I used the complete underframe and only added styrene channels along the sides, fabricated new buffer beams and reproduced weld lines along the edgers of the sidesills.
The hood featured a three-piece radiator grille, engine doors, sand filler hatch and chimney. The cab is an open version.
The small piece of the die-cast weight will be covered with the gearbox.
There is still enough room under the hood to house the front light and the decoder and wiring.
I painted the frame with a signal red color. For the body I tried the rock salt chipping paint method, which rendered a very nice rusted finish with chipping paint..
The levers, gears and seat are all scratchbuilt using different bits and pieces of styrene.
Well, as you can see, the effort was not worth a Merit Award, but worth a new experience because this was my first freelanced locomotive. I could try a couple of new techniques, both in scratchbuilding and painting/weathering.
Wednesday, November 2, 2016
Master Builder - Motive Power (One down, two more to go)
On Saturday, October 29, 2016 my On30 rail car met the judges at the NMRA British Region Convention in Meriden near Birmingham.
I was part of the judging team but I did not judge my own model. My team judged the steam locomotives and cabooses.
I was very proud when after the math was done, my score was 111 out of 125 points. In the categories "Detail" and "Conformity" I scored the maximum available points of 20 respectively 25. Also in "Scratchbuilding" I scored 14 of the 15 possible points, which confirms my thinking of doing things from scratch rather than modifying a kit.
I probably have the required scratchbuilt model in Motive Power, although, I think, I'll do the remaining two from scratch as well. It's more fun to create something from basic shapes.
Here is the judging form with the scores and the comments from the judges.
I was part of the judging team but I did not judge my own model. My team judged the steam locomotives and cabooses.
I was very proud when after the math was done, my score was 111 out of 125 points. In the categories "Detail" and "Conformity" I scored the maximum available points of 20 respectively 25. Also in "Scratchbuilding" I scored 14 of the 15 possible points, which confirms my thinking of doing things from scratch rather than modifying a kit.
I probably have the required scratchbuilt model in Motive Power, although, I think, I'll do the remaining two from scratch as well. It's more fun to create something from basic shapes.
Here is the judging form with the scores and the comments from the judges.
Master Builder - Motive Power (Written documentation sample)
The following pages are a sample of my written descriptions. I also add copies of the articles and additional photographs if available. This time I included photos of the different building steps, to show the judges how I put the model together or how I constructed special items. Sometimes pictures tell more than a thousand words.
I know that many members hate all this paperwork, but being a judge myself, I know how frustrating it is when you are looking over a model and you can only score what you see. Most of the time there was more work done than is actually visible.
As a positive side effect, a detailed description may also serve as the base for an article, if you're working on your Author Certificate as well.
Master Builder - Motive Power (On30 Rail Truck)
After having eight certificates checked off and Master Model Railroader status achieved, I realized that the remaining three would be not so far out of reach. I found that my skills were refined enough to dare the Motive Power Certificate.
Like with some of my models for the Cars Certificate, I browsed through the pages of my magazines to find something that inspired me to build. A little critter caught my eye in an issue of the Narrow Gauge Gazette. It is actually a M.A.C. Model 4-41 Rail Car which was build by Motor Appliance Corporation, the name under which Skagit Steel & iron Works in Sedro Wolley, Washington marketed these gasoline powered rail cars. Not to be confused with the Mack trucks, rail buses and locomotives built in Allentown, Pennsylvania.
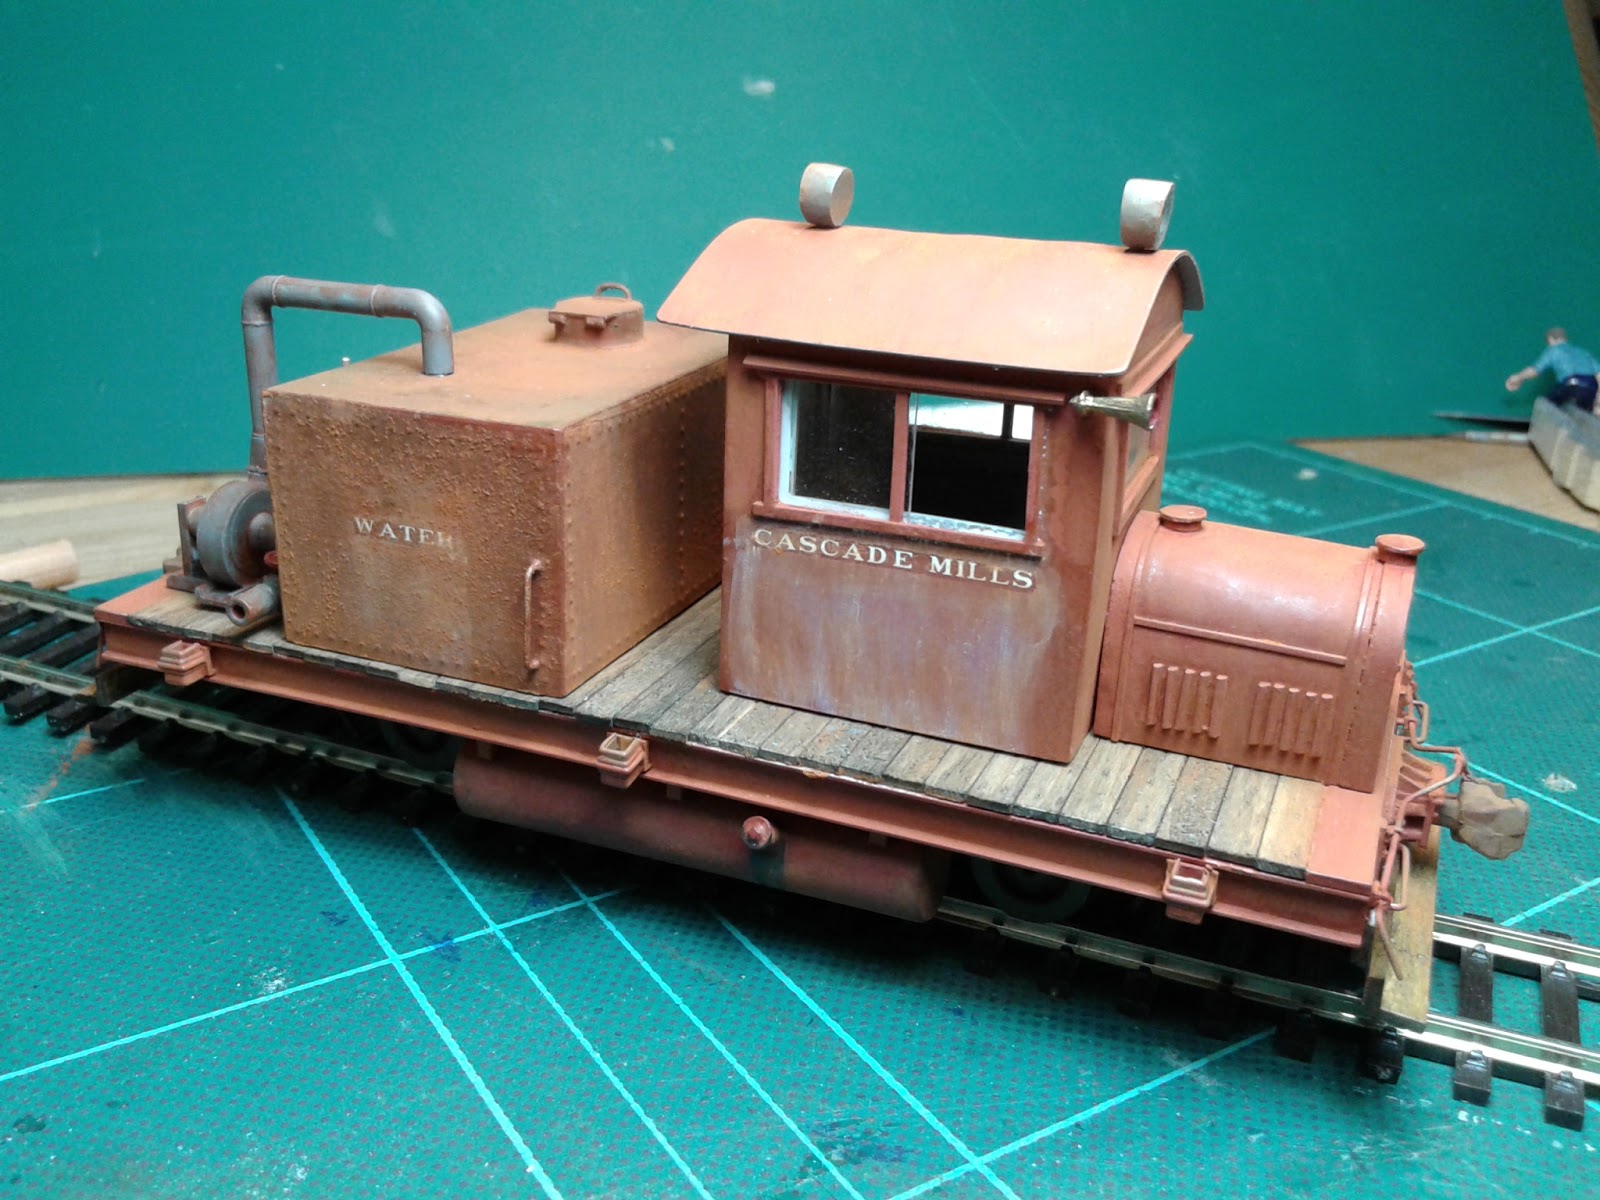
The deck of the rail car was basically a powered flatcar with a cab and an engine hood on top. Because I did not have any spare parts or gears to build the power chassis from scratch, I decided to look for a powered chassis which could be substituted. The motor, gears and wheels are parts that are exempt from scratchbuilding, so I found that the HO powered rail bus from Bachman would fit the bill.
I left an opening in the deck to allow it to sit deeper on the chassis. The underframe with the sills, coupler and stake pockets finished, I turned to the cab and hood.
I formed the radiator from three layers of plain styrene with a rectagular cut-out for the brass mesh, representing the radiator grill. I curved a piece of .015" styrene in boiling water to avoid breaking it.
Then I applied louvers from quarter round styrene strip and trim using 1x2 strips. The radiator and sander caps are scrap pieces of styrene tube and .015" sheet.
The cab was build from four pieces of plain styren with cut-outs for the doors and windows. The water tank is also basically a rectangular box from plain styrene sheet.
I made the roof removable to see the interior.
The water pump is basicalle the front part of an HO tractor model with blower castings and piping from Auhagen.
I added some more details to the underbody. A Grandt Line brake cylinder with rod, brake pads on all four wheels, sander piping to all four wheels, an exhaust side pipe, gasoline tank and tool box
The water tank received several layers of Rustall and burnt umber to recreate heave rust.
The cab, deck and roof underwent also a heavy weathering treatment. I stained the planks with my usual black ink and isopropyl alcohol mix and also punched nail holes, taking care to locate them exactly over the sills underneath. I decalled the cab sides with a fictional name and the water tank with the wording "Water". The decalling on the sides actually came from a Santa Fe passenger car name as well ass the "Water" decal from the tank.
Then I attached all these components on top of the deck.
Because the cab decal left some silvering after application I tried to improve the look by simulating the white from the lettering running down the sides of the cab. This was achieved by applying small dots of white oil paint to the letters and with a wide brush dampened with Turpentine I streaked the paint down.
The effect of the running white paint could not hide the silvering completely, but it did not lead to a major loss of points.
The final touch before heading to the convention in Birmingham was to add the engineer figure into the cab.
Like with some of my models for the Cars Certificate, I browsed through the pages of my magazines to find something that inspired me to build. A little critter caught my eye in an issue of the Narrow Gauge Gazette. It is actually a M.A.C. Model 4-41 Rail Car which was build by Motor Appliance Corporation, the name under which Skagit Steel & iron Works in Sedro Wolley, Washington marketed these gasoline powered rail cars. Not to be confused with the Mack trucks, rail buses and locomotives built in Allentown, Pennsylvania.
The deck of the rail car was basically a powered flatcar with a cab and an engine hood on top. Because I did not have any spare parts or gears to build the power chassis from scratch, I decided to look for a powered chassis which could be substituted. The motor, gears and wheels are parts that are exempt from scratchbuilding, so I found that the HO powered rail bus from Bachman would fit the bill.
I formed the radiator from three layers of plain styrene with a rectagular cut-out for the brass mesh, representing the radiator grill. I curved a piece of .015" styrene in boiling water to avoid breaking it.
Then I applied louvers from quarter round styrene strip and trim using 1x2 strips. The radiator and sander caps are scrap pieces of styrene tube and .015" sheet.
The cab was build from four pieces of plain styren with cut-outs for the doors and windows. The water tank is also basically a rectangular box from plain styrene sheet.
I made the roof removable to see the interior.
The water pump is basicalle the front part of an HO tractor model with blower castings and piping from Auhagen.
I added some more details to the underbody. A Grandt Line brake cylinder with rod, brake pads on all four wheels, sander piping to all four wheels, an exhaust side pipe, gasoline tank and tool box
The water tank received several layers of Rustall and burnt umber to recreate heave rust.
The cab, deck and roof underwent also a heavy weathering treatment. I stained the planks with my usual black ink and isopropyl alcohol mix and also punched nail holes, taking care to locate them exactly over the sills underneath. I decalled the cab sides with a fictional name and the water tank with the wording "Water". The decalling on the sides actually came from a Santa Fe passenger car name as well ass the "Water" decal from the tank.
Then I attached all these components on top of the deck.
Because the cab decal left some silvering after application I tried to improve the look by simulating the white from the lettering running down the sides of the cab. This was achieved by applying small dots of white oil paint to the letters and with a wide brush dampened with Turpentine I streaked the paint down.
The effect of the running white paint could not hide the silvering completely, but it did not lead to a major loss of points.
The final touch before heading to the convention in Birmingham was to add the engineer figure into the cab.
Tuesday, October 28, 2014
Awards Ceremony
My Master Model Railroader status was already announced in January this year, but for the receipt of my certificate and engraved plaque I opted for the British Region Convention in October 2014.
So I attended the convention from October 17-19, 2014 in Bournemouth.
After the Saturday Banquet the traditional Awards Ceremony started with the Contest results and the Merit Awards for the models that reached at least 87.5 points out of 125.
The MMR Award consists of various documents (Plaque, Certificate, Congratulatory Letter, Jacket Patch and Lapel Pin)
Steve Park, the Department Assistant Manager of the Achievement Program suggested to split the honor of awarding these documents to me among the Past President, the actual President and finally himself.
Mike Arnold, the new President of the British Region made a very nice introduction (we laughed a lot during the ceremony) and handed me the Certificate.
On the picture above, Yours truly flanked by Mike Arnold and Steve Park
Finally Steve Park awarded me with the engraved plaque, stating me as MMR #526.
The plaque will be prominently placed in my home. I am very proud of what I have achieved and again I want to thank everybody who helped and encouraged me along this wonderful journey.
So I attended the convention from October 17-19, 2014 in Bournemouth.
After the Saturday Banquet the traditional Awards Ceremony started with the Contest results and the Merit Awards for the models that reached at least 87.5 points out of 125.
The MMR Award consists of various documents (Plaque, Certificate, Congratulatory Letter, Jacket Patch and Lapel Pin)
Steve Park, the Department Assistant Manager of the Achievement Program suggested to split the honor of awarding these documents to me among the Past President, the actual President and finally himself.
Keith Webb, the Past President of the British Region handed me the congratulatory letter from Paul Richardson (Department General Manager) together with the Jacket patch and lapel pin.
Mike Arnold, the new President of the British Region made a very nice introduction (we laughed a lot during the ceremony) and handed me the Certificate.
On the picture above, Yours truly flanked by Mike Arnold and Steve Park
Finally Steve Park awarded me with the engraved plaque, stating me as MMR #526.
The plaque will be prominently placed in my home. I am very proud of what I have achieved and again I want to thank everybody who helped and encouraged me along this wonderful journey.
Friday, May 9, 2014
MMR announced
Now its official.


Together with my Model Railroading Biography
My last certificate, Master Builder Cars and my MMR achievement have been published in the NMRA Magazine in May 2014.


Together with my Model Railroading Biography
Subscribe to:
Posts (Atom)


