Master Model Railroader

"An NMRA member qualifies as a Master Model Railroader when he or she has obtained at least seven of the eleven Achievement Certificates provided that he or she has earned at least one Achievement Certificate in each of the four areas of the Regulations. Earning the title of Master Model Railroader is the ultimate goal for many participants in the Achievement Program."

Thursday, June 21, 2018

Master Builder - Motive Power Certificate Earned

After there had been much controversy about the use of ready-to-run or self-powered trucks from either a model or from Tenshodo or NWSL, we could finally set on a graphic which shows exactly what the requirements mean. This was often misinterpreted by either the modelers and also the judges or assessors. The use of these self-powered drives is permitted and saves the modeler from building the drive from scratch also.


My efforts in completing the Motive Power Certificate resulted in four locomotives built, from which even two met the scratchbuilding requirement, although only one was needed.


M.A.C. Rail Truck in On30 earned a Merit Award with 111/125 points and counts towards scratch-built.


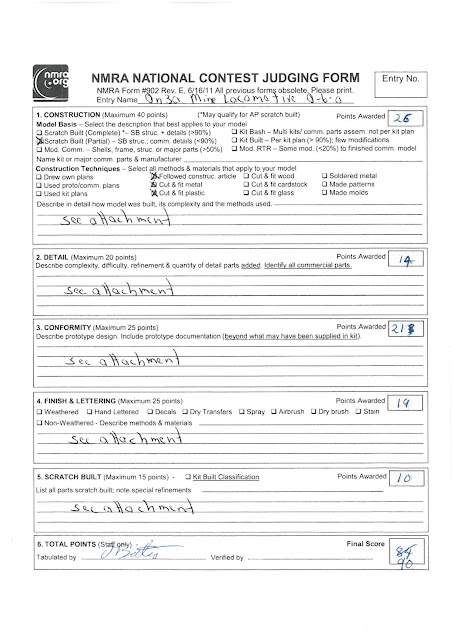
0-6-0 Mine Locomotive in On30 received 90/125 and a Merit Award.


Industrial Diesel in 1/35 scale earned a Merit Award with 106/125 points. It also qualifies as scratch-built.


This Industrial Diesel in 1/35 scale only earned 78/125. I earned no Merit Award but acquired some new skills which helped me in building the USN diesel. Sometimes one has to admit that a model was perhaps not up to the requirements and instead of quitting and argueing, start anew and learn from the failure. Always remember, Modeling is fun!


After sending in all the documentation, I got confirmation end of March 2018, that I had earned my 10th AP Certificate. Now on to the last one, Prototype Models.


Monday, February 26, 2018

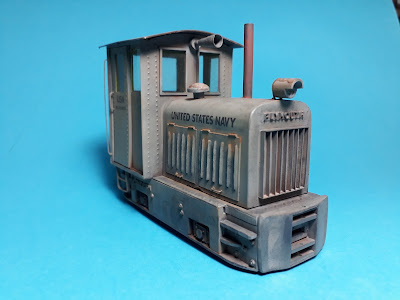
Master Builder - Motive Power (Plymouth Industrial Diesel)

 Plymouth Industrial Diesel (1/35 scale)

 After only two of my three models earned a Merit Award, I build another narrow gauge critter. HO powered trucks are very convenient for larger scale locomotives. You may use an HO drive to build an On30 locomotive or a 600 mm gauge locomotive in 1/35 scale with HO almost being the scale equivalent of 600 mm.
I searched the internet for pictures of suitable narrow gauge diesel locomotives.

For this littel engine, I again used a powered drive from Model Power. Whereas their Plymouth diesel has the side sills cast to the frame, the Porter drive is clipped into the body of their Hustler locomotive.


Using the drive as a guide I built the side sills to fit the wheel spacing.


I had to make a cut-out in the deck for the the engine mount and a large die-cast weight. With the side sills and buffer plates, I build a new frame with the drive attached.


The buffer beams are pieced together with different bits of styrene strip and sheet. I sanded the to achieve the rounded shape. The larger opening is where the Kadee coupler protrudes. The locomotive may also be used with link and pin draft gear.


I added steps, nut-bol-washer castings and Slaters 2 mm letters for the Plymouth signage. The wheel bearers are also layered styrene with n-b-w's. I lined the top of the frame with Slaters styrene tread pattern sheet.


The cab is also built by laminating an inner wall to a base sheet and a thinner sheet with imbossed rivets to the outside. Small styrene strip is used for the window trim and styrene channel for the sliding door guides.


The hood was formed around a styrene core, sanded to shape. The radiator grill is pieced together using styrene strip and the engine doors are cardboard with louver slots cut and hardened with Super Glue. On my previous industrial diesel I used quarter round styrene strips to simulate the louvers, but the openings cut into cardboard are more realistic.


The interior features a dashboard with gauges, buttons and ignition key. The buttons are sewing pin heads and the gauge is cut with a paper punch. A folding seat and brake wheel with chain is attached to the rear wall.


The lamp shades are cut from styrene tube with LED's added. The LED legs serve as mounting pins as well. The horn is scratchbuild using .005" styrene rolled around a core of styrene rod. The chimney is also a piece of styrene tube.


The air filter intake is an HO roof vent from my scrapbox.


A friend created the USN decals.


I painted the locomotive Golden Olive for the interior and Medium Sea Grey on the outside. I finally weathered the locomotive with PanPastels.
My efforts have been rewarded with a 106/125 score, although the scratchbuilding score is a bit low for the effort put into this locomotive.


Wednesday, January 17, 2018

Master Builder - Motive Power (Requirements)

Motive Power

First, let's define what is meant by "Motive Power": it is any type of steam, diesel, or electric locomotive, traction unit, maintenance vehicle, or other type of self propelled vehicle that runs on rails. This includes everything from speeders to streetcars to Big Boys. It does not include things that are powered models of unpowered vehicles (like hand cars) or unpowered models of powered prototypes (like dummy locomotives).
Contact your Regional AP Manager if you have a question about which category a particular model would fall into.

To qualify for the Master Builder - Motive Power certificate:

Build three scale models of railroad motive power, one of which must be scratchbuilt. Motive Power is defined as a locomotive or a self-propelled vehicle.
  1. To qualify as scratchbuilt, the motive power must contain the following scratchbuilt items as applicable:
    Steam Locomotives: frame, boiler, cab, tender, frame, body, either valve gear or main and side driving rods. Other Motive Power: body, frame, cab, power truck side frame, pantograph or trolley poles where appropriate.
    All models must be capable of self-propulsion on track of the same gauge as the model. Power trains for all models may be commercial motors and gears.
    All models must be super detailed either with scratchbuilt parts or with commercial parts as defined in the Definitions Section.
  2. The following parts are specifically excluded from the scratch built requirement (although you may scratch build them to earn additional points):
    • Motor
    • Gears
    • Drivers and wheels
    • Couplers
    • Light bulbs & electronics
    • Trucks
    • Paint, decals,etc.
    • Bell
    • Marker and classification lights
    • Brake fittings
    • Basic shapes of wood, plastic, metal,etc. ("Basic shapes are things that builders of the prototype would have used as raw materials. For example an "I" beam would be a basic shape; a commercial door or window casting would not.)
  3. The term "scratch built" implies that the modeler has done all of the necessary layout and fabrication that produces the final dimensions, appearance, and operating qualities of the model. This is a good statement of the intent and spirit of the 'scratch built' requirement. Notice that it does not say that the use of a few commercial detail parts will disqualify the model as being "scratch built". In general, the same standard applies that is used in contest judging: "Completely Scratch built" means that 90% or more of the model was scratch built. (But you do need to scratch build the listed in requirement 1-A above.) Taking an existing model and modifying it to be a powered model is not considered "scratch building." Examples of this would be taking a passenger car and converting it into a trolley, or a box car and converting it into a box-cab locomotive. These do not meet the definition or the spirit of the term "scratch built" given above.
Earn a Merit Award of at least 87.5 points with each of the three scale models of motive power either via an NMRA sponsored contest or AP Merit Award Judging.

Association - Official (Requirements)

Official

To qualify for the Association Official certificate, you must:

Have served in an office of President, Vice-President, Secretary, Treasurer, or Director, and have completed satisfactory service in one of the following:
  • At least one year in office at the national level.
  • At least two years in the office(s) at the regional level, of which one shall be Region President or Trustee.
  • At least three years in the office(s) at the regional level, if other than Region President or Trustee.
  • Division Superintendents or Directors who serve as voting members of the Region Board of Directors, either by election, appointment, or automatic by-law provision, shall be eligible for the certificate on the same basis as any other Region Board member (i.e. three years of service required).
In some regions the President and the Trustee were the same person (The Region Trustee position was eliminated in January of 2005 when new NMRA Regulations were formally adopted by the BOD). In this case, that person would get credit for serving in both offices, which would mean that they would only require one year of service.
Sometimes there is a question about whether a particular office qualifies for "Association Official " or "Association Volunteer". In general, the test is: if holding an office makes you a voting member of the Region (or National) Board of Directors, then it counts toward "Official"; otherwise, it counts toward "Volunteer".
However, you may receive "Volunteer" credit for holding an office that would otherwise qualify for "Official" as long as you are not claiming credit for "Official" at the same time. For example, if someone were to serve as Division Superintendent for 5 years (and that being Superintendent made them a voting member of their Region 's Board of Directors). They could use the first three years of their term to qualify for the "Association Official" certificate, and the remaining two years to qualify to 24 months worth of "Association Volunteer" points.

I held the position of Region President of the European Region from January 2015 until January 2018 for a first term.

I received my Certificate for Association - Official during the awards ceremony at the British Region Convention on October 28, 2017 in Derby, UK.


Tuesday, January 16, 2018

Master Builder - Motive Power (Two more down) On30 0-6-0 Mine Locomotive

The second locomotive that caught my interest was built from an article I saw in the Narrow Gauge Gazette. The author built it in Gn15, based on an On30 chassis of a 2-6-0 steam locomotive.

I had an old MDC/Roundhouse kit of a 0-6-0 Tank Locomotive lying around and thought it could probably fit the bill if I build the same locomotive in On30 based on the HO chassis.


These old MDC/Roundhosue locomotive kits were state-of-the-art back in the early days although they all reminded me a bit to a coffee grinder when running. This locomotive has an open frame Pittman style motor screwed to the die-cast frame. A worm gear drives the center axle.


I imagined that I could use an PVC pipe, cut a slot out to fit over the motor and have by this a smokebox, boiler and firebox in one piece. The cab on the "prototype" model was sitting only 6 scale inches above the rails. I fabricated a platform for the cab which I could slide over the rear part of the frame and attach it with a screw. In case of motor problems I could unscrew the cab and remove the boiler tube which was held with a screw in front of the frame.
 

A very interesting item to build was the saddle tank that is located over the smoke box and boiler. I cut a hole, centered on the watertank for the steam dome. The two square boxes to the front are the sandboxes.
 

I build the firebox around the larger part or the PVC tube. The cab assembly slides over the rear tube and is attached to the frame with a screw on the bottom. I added levers and gauges from my parts box. The firebox door mechanism was built using a photo for reference.


I also included a fuel tank in the cab. Obviously the coal burner was converted to oil for its use in the mines.

The photo above shows the painted interior and part of the chipping paint effect on the outside of the cab.


I added quite a few features to the locomotive like sander pipes, pressure tanks, buffer beam and scratchbuilt draft gear boxes.


The front and rear buffer beams are balsa wood, scribed and weathered.

Unfortunately there was a big controversy about the use of commercial chassis or frames, with the result that this locomotive also did not earn a Merit Award. I insisted on a re-assessment and explained a couple of things I've done which obviously escaped to the assessors in their first evaluation. The model finally passed with 90 points and a Merit Award.

Although I put high hopes in my two builds, all the discussions around the scores nevertheless leave a bad taste. Although I'm very proud of how they turned out, I had to admit that some features were missing. But I never thought that a commercial frame had such an impact on the overall evaluation of the models.


I accepted the verdict and kept on building another model.

Master Builder - Motive Power (Two more down) 1/35 Industrial Diesel Locomotive

In July 2017, in anticipation of the British Region Convention in Derby, at the end of October, I started building my second model for the Motive Power Certificate.

I wanted to build a small industrial diesel based on a commercial HO chassis. The locomotive in mind was a small freelanced narrow gauge diesel riding on roughly 600 mm track. If I build my model in 1/35 scale, I could use actual HO track.

I acquired a couple of small HO diesels from the Model Power range. Their Porter Hustler and DDT Plymouth are good candidates for such a conversion.


 The Model Power chassis has the motor mounted vertically and it fills the cab of the locomotive, which is not very prototypical and impossible to correct if you want to add a cab interior..


As my locomotive will be in a larger scale, I could fit the motor under the new hood and leave the cab area free of obstructions. The body shell of the original locomotive was held in place with a screw from below. I used the part of the original shell and built the new hood around it. By this I was able to fix the hood with the screw. 


For this build, I used the complete underframe and only added styrene channels along the sides, fabricated new buffer beams and reproduced weld lines along the edgers of the sidesills.


The hood featured a three-piece radiator grille, engine doors, sand filler hatch and chimney. The cab is an open version.


The small piece of the die-cast weight will be covered with the gearbox.


There is still enough room under the hood to house the front light and the decoder and wiring.


I painted the frame with a signal red color. For the body I tried the rock salt chipping paint method, which rendered a very nice rusted finish with chipping paint..


The levers, gears and seat are all scratchbuilt using different bits and pieces of styrene.

Well, as you can see, the effort was not worth a Merit Award, but worth a new experience because this was my first freelanced locomotive. I could try a couple of new techniques, both in scratchbuilding and painting/weathering.